
Zoom Setup for Online Bass Lessons
Equipment list, hookup guide, and software settings for the audio path that works for live online bass lessons.
Follow the steps below to get ready for your first live online bass lesson.
Download the setup guide (PDF) to print or keep on your phone. It is the short version of this page.
How lesson audio works
Every setup on this page does the same five things. Once you can name them, you can look at any mixer or interface you already own and see which piece does which job.
A Zoom lesson has two ends: you, the student, and me, Russ. Every job below is about sound getting from one end to the other, and never back to where it started.
- Bass → RussYour bass reaches Russ.
- Playback → Russ and studentA backing track, iReal Pro, Spotify, or a metronome reaches Russ and the student.
- Voice → RussYour voice reaches Russ.
- Russ → studentRuss's voice and bass reach the student's ears.
- No loopbackWhat Russ sends never comes back to Russ, and what the student sends never comes back to the student.
On the recommended mixer the rule is a physical switch, Record Source set to INPUT MIX. On an audio interface it is which virtual device you tell Zoom to send. Same rule, different knob.
Shopping List
Start with the recommended setup: a small mixer and a headset. It is the least gear, the fewest cables, and what I recommend to new students. If you already own headphones, a microphone, a DI, or an interface, keep them; the options that improve the lesson show where each one plugs in.
Recommended setup (~$125)
A small mixer and a headset: the least gear and the fewest cables.
| Item | Price | Notes |
|---|---|---|
| Rockville RockMix 4 mixer | ~$60 | Comes with USB cable and power adapter. |
| HyperX Cloud Stinger Core headset | ~$40 | Headset with built-in mic. Includes Y-splitter cable (separates mic and headphone plugs). |
| 1/4-inch instrument cable | ~$15 | Connects your bass to mixer (the larger plug). |
| 3.5mm to dual 1/4-inch cable | ~$10 | Connects phone/tablet to mixer for playback audio (backing tracks, metronome). |
What I use myself is the same kind of setup: my amp's DI out into CH1, a separate mic into CH2, and playback from my MacBook through a small headphone preamp into CH3/4. CH1 and CH2 are the same kind of input, so bass and mic can take either one; the steps below put the mic on CH1 and the bass on CH2.
You May Also Need
- USB-C to 3.5mm adapter (~$8) — if your phone doesn't have a headphone jack.
- 1/4-inch to 3.5mm adapter (~$8) — only if your headphones have a 3.5mm plug (the small plug) instead of 1/4-inch (the large plug).
Already own a mixer or an audio interface? See the other setups. Want a better mic, a DI, or louder headphones? See the options that improve the lesson.
What Your Cables and Gear Look Like
Not sure what these cables are? Here's a visual reference so you know exactly what to buy.
Setup Steps
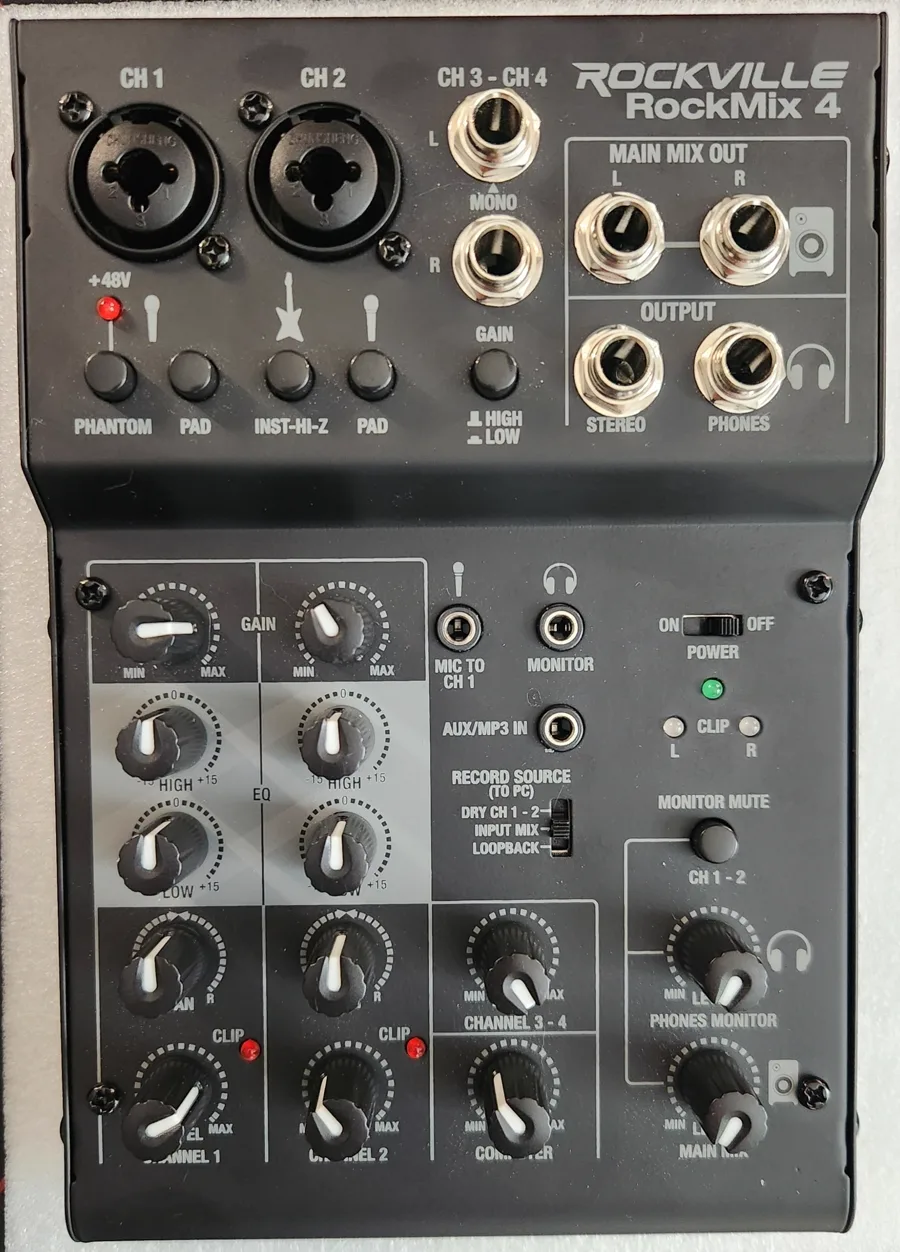
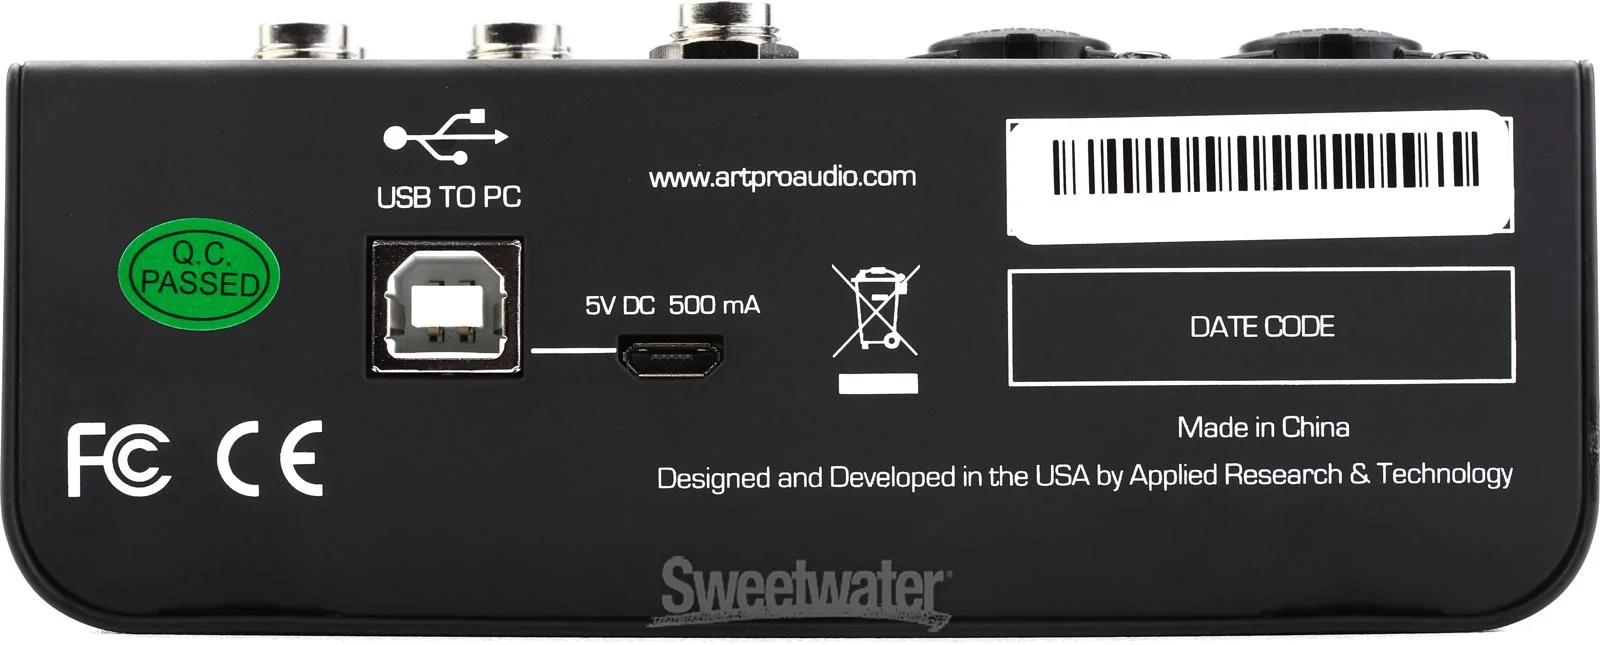
Follow these steps to connect all your gear. Use the diagrams below to find each connection on the mixer.
Mixer — Top View
Mixer — Back Panel
Connect your microphone (separate-mic setup only)
Job: Voice → Russ
Place your microphone in a desk stand and position it near your mouth. Plug one end of the XLR cable into your microphone and the other end into the CH1 input on the mixer.
About phantom power: The Shure SM58 does not need phantom power. If you use a condenser microphone that requires it, turn on the +48V switch on the mixer. Otherwise, leave it off.
XLR cable — male end (pins) to mixer, female end (holes) to microphone Connect your bass
Job: Bass → Russ
Plug your 1/4-inch instrument cable (the larger plug) from your bass into the CH2 input on the mixer.
About Hi-Z: If your bass is passive (no battery compartment), press the INST/Hi-Z button on the back of the mixer. If your bass has an active preamp (battery compartment), leave this button off.
1/4-inch instrument cable — plug one end into your bass, the other into CH2 Connect your playback device
Job: Playback → Russ and student
Your playback device can be a phone, tablet, or computer — anything that plays backing tracks, metronome apps, or lesson materials. See apps for lessons for the specific tools I recommend students use.
Plug the 3.5mm end (the small plug) of the cable into your device's headphone jack.
Plug the two 1/4-inch ends (the larger plugs) into the CH3 (L/left) and CH4 (R/right) inputs on the mixer.
No headphone jack? Use a USB-C to 3.5mm adapter (or Lightning to 3.5mm for older iPhones).
Set your playback device's volume to maximum. Use the CH3/4 knob on the mixer to control the playback volume.
3.5mm to dual 1/4-inch cable — small plug to your device, two large plugs to CH3/CH4 Connect your headphones
Jobs: Russ → student, Voice → Russ
If you're using the recommended headset, plug the mic cable from its Y-splitter into the HEADSET mic jack (3.5mm) on the mixer, and the headphone cable from the Y-splitter into the HEADSET headphone jack (3.5mm).
If you're using separate headphones and a microphone instead, plug your headphones into the PHONES output (1/4-inch jack on the front of the mixer). Use a 1/4-inch to 3.5mm adapter if your headphones have a 3.5mm plug.
OneOdio Pro-10 headphones — includes both 1/4-inch and 3.5mm cables Set the Record Source switch
Job: No loopback
Find the RECORD SOURCE (TO PC) switch on the top of the mixer. Set it to INPUT MIX.
See the top view diagram above to find the Record Source switch.
This step is the no-loopback job. It is the one setting on the whole board that protects both of us from echo.
Connect the mixer to your computer
Jobs: Bass → Russ, Playback → Russ and student, Voice → Russ, Russ → student
Plug the included USB cable from the back of the mixer into your computer. This is how the mixer sends and receives audio with Zoom.
Connect the included power cable (micro USB) to power the mixer. Plug the other end into a wall outlet or power strip.
Your computer recognizes the mixer automatically — no software or drivers to install. See the back panel diagram above.
| Job | What does it here |
|---|---|
| Bass → Russ | Instrument cable into CH2 on the mixer. |
| Playback → Russ and student | Phone or tablet into CH3/4 with the 3.5 mm to dual 1/4-inch cable. |
| Voice → Russ | The headset mic, through the Y-splitter into the mixer. |
| Russ → student | The headset earcups from the mixer headphone jack. Zoom comes in on the computer channel. |
| No loopback | Record Source set to INPUT MIX. Your channels go to Zoom; Zoom does not go back to Zoom. |
If it goes wrong
The first five things I check with a new student, in this order.
You hear your own voice back with a delay.
Check: The Record Source switch. It is on LOOPBACK.
Fix: Set it to INPUT MIX.
I hear myself echo.
Check: Same switch, same cause.
Fix: Set Record Source to INPUT MIX, then have me talk again.
I hear your bass but not your voice, or the other way round.
Check: The channel gain for the quiet one. Watch the level light while you play or talk.
Fix: Turn that channel up until the light flickers on the loud notes and stays off the rest of the time.
Your backing track is only in your ears and I cannot hear it.
Check: The playback device is plugged into the computer, not the mixer.
Fix: Move it to CH3/4 on the mixer. If the computer is the playback device, run its headphone jack into CH3/4 with the 3.5 mm cable, the same as a phone, and leave the system output on the built-in speakers or headphone jack.
Everything is very quiet in your headphones.
Check: The mixer headphone knob and the computer channel knob.
Fix: Turn both up. If it is still quiet, put a small headphone amp between the mixer's headphone jack and your headphones; the live guide shows the cable under Options that improve the lesson.
Computer Audio Settings
Tell your computer to send audio through the USB mixer so you hear everything in your headphones.
Mac
Open System Settings > Sound > Output. Select the USB mixer (it appears as "USB Audio CODEC" or something similar).
Windows
Open Settings > System > Sound > Output device. Select the USB mixer.
Windows 10 has a similar path — look for Settings > System > Sound.
Zoom Audio Settings
In Zoom , go to Settings > Audio.
- Microphone: select the USB mixer.
- Speaker: select the USB mixer.
- Enable Original Sound for Musicians — this preserves your bass tone. Zoom's default audio processing filters out low frequencies, which makes your bass sound thin and distant.
Mixer Settings & Levels
These are good starting points. You can fine-tune during your first lesson.
- Record Source
- INPUT MIX (see Step 5 above).
- CH1 (voice)
- Start at 5. Adjust so the green LED lights on peaks — if the red LED stays on, turn it down.
- CH2 (bass)
- Start at 5. Same as above — green LED on peaks, no steady red.
- Gain (CH1 and CH2)
- Start at the midpoint (12 o'clock). Turn down if the red clip LED stays lit.
- CH3/4 (playback)
- Start at 5. Adjust for comfortable backing track volume in your headphones.
- COMPUTER (teacher's audio from Zoom)
- Start at 5. Adjust so my voice is comfortable in your headphones.
- PHONES/MONITOR
- Adjust for comfortable headphone volume.
- MAIN MIX
- Start at 5. Controls the overall level sent to Zoom.
- EQ (HIGH and LOW)
- Leave at center (12 o'clock) — flat, no boost or cut. Adjust later if needed.
- PAN (CH1 and CH2)
- Leave at center.
- Phantom power (+48V)
- Leave OFF unless your microphone requires it. The Shure SM58 does not need phantom power.
Options that improve the lesson
The recommended setup is enough for a good lesson. Each option here makes one part of it better: your voice, your bass tone, how loud your headphones can go, or playing tracks from the computer. Each one names the job it changes.
A separate microphone and headphones instead of a headset
Job: Voice → Russ
The mic plugs into CH1 with an XLR cable, the headphones into the headphone jack. Every other step stays the same.
You will also need: One XLR cable, a mic stand, and a 1/4-inch adapter if your headphones have the small plug. About $140 more than the headset.
If it goes wrong
The mic is very quiet even with the gain up. Check: It is a dynamic mic with a low output, or a condenser without phantom power. Fix: For a condenser, turn on +48V. For a quiet dynamic, add an inline mic booster (next item).
An inline mic booster for a quiet dynamic mic
Job: Voice → Russ
A small box between the mic and CH1 that adds clean gain. It needs the mixer +48V switch on to power itself.
You will also need: One extra XLR cable.
If it goes wrong
Still quiet. Check: The +48V switch is off, so the booster is not powered. Fix: Turn +48V on.
A DI box or a preamp pedal with a DI out
Job: Bass → Russ
Bass into the box, the XLR out of the box into CH1 or CH2. You get your own tone shaping before the mixer, and a balanced signal that picks up less noise.
You will also need: One XLR cable.
If it goes wrong
Hum or buzz. Check: The ground lift switch on the box. Fix: Flip it.
A headphone amp when the mixer is too quiet
Job: Russ → student
A small amp between the mixer headphone jack and your headphones. Some studio headphones need more than a small mixer gives.
You will also need: One short 1/4-inch cable.
If it goes wrong
Loud enough now, but distorted. Check: The mixer headphone knob is all the way up. Fix: Turn the mixer down and the amp up.
Playing backing tracks from the computer instead of a phone
Job: Playback → Russ and student
It works if the computer keeps its system output on the built-in speakers or the headphone jack and only Zoom uses the mixer. Run the headphone jack into CH3/4 with the 3.5 mm cable, the same as a phone. A phone or tablet is simpler because nothing else on it is talking to the mixer.
You will also need: Nothing, if the computer has a headphone jack. A USB-C to 3.5 mm adapter if it does not.
If it goes wrong
I cannot hear the track, or I hear it twice. Check: Which output the track app is using. Fix: Send the app to the mixer and keep Zoom on the mixer too. If it fights you, use a phone.
Other whole setups
Two setups I see often enough to walk through. Each one does the same five jobs; the table shows which piece does which.
A USB mixer without a Record Source switch
Most cheap USB mixers send everything they receive back over USB, including my audio from Zoom. Nothing on the board does the no-loopback job, so you do it by staying muted in Zoom when you are not playing or talking. It works. It is not ideal, because I lose the ability to hear you all the time.
| Job | What does it here |
|---|---|
| Bass → Russ | Instrument cable into a line or Hi-Z channel. |
| Playback → Russ and student | Phone or tablet into a stereo channel. |
| Voice → Russ | Mic into a mic channel, or the headset through a Y-splitter. |
| Russ → student | Headphones on the mixer headphone jack. |
| No loopback | Nothing on the mixer does this job, so you do it: stay muted in Zoom when you are not playing or talking. It works, but I lose the ability to hear you all the time. |
If it goes wrong
I hear myself echo as soon as you unmute.
Check: This mixer sends everything it receives back over USB, including my audio from Zoom.
Fix: Mute in Zoom between playing, or move to the recommended mixer or the interface setup below.
An audio interface and virtual audio devices
If you already own an audio interface, this is how it does the five jobs. Bass and mic go into the interface. A virtual-audio app (Loopback on the Mac, VoiceMeeter is the Windows equivalent) makes two virtual devices: one that collects your playback app, and one that holds bass, mic and playback for Zoom to send. Zoom's own output goes to the playback device, so it is never in the device Zoom sends. Everything is mixed in software; the jobs do not go away, they just share a box. I have not written a click-by-click walkthrough for this one; the table is the map, and I can talk you through the rest in a lesson.
| Job | What does it here |
|---|---|
| Bass → Russ | Bass into an interface input, straight or through a DI. |
| Playback → Russ and student | A virtual device (Loopback on the Mac) collects the app you play from. Zoom picks it up as part of the send. |
| Voice → Russ | Mic into the other interface input. |
| Russ → student | Zoom is told to play to your playback device, which feeds your headphones on the interface. |
| No loopback | Zoom is told to send the virtual device that holds bass, mic and playback, and nothing else. What Zoom plays is not in that device, so it never goes back. |
If it goes wrong
I hear your backing track twice, or I hear myself.
Check: Which device Zoom is sending. It is the one that also contains Zoom output.
Fix: Point Zoom at the send-only virtual device. Keep Zoom playback out of it.
I hear nothing from you.
Check: The Zoom microphone setting is still on the built-in mic.
Fix: Pick the virtual device as the microphone in Zoom audio settings.
Troubleshooting
Before you blame the gear, check these three. The second one is the one everybody skips.
Sound drops out or stutters, or the video freezes.
Check: The internet first: are you on wifi, and is anyone else streaming? Run a speed test.
Fix: Plug into the router with an ethernet cable if you can. Otherwise move closer to it and pause other downloads.
Zoom lags even though the internet tests fine.
Check: Memory and CPU. Open Activity Monitor on a Mac or Task Manager on Windows. A laptop with 8 GB and a browser full of tabs runs out of room.
Fix: Quit everything except Zoom and the app you play tracks from. Restart the computer before the lesson if it has been up for days.
No sound at all, either way.
Check: Zoom audio settings. The microphone and the speaker are set to the built-in ones, not the mixer.
Fix: Pick the USB mixer for both. Test with the Zoom microphone test before the lesson starts.
Tips for a Better Lesson Experience
- Camera positioning: Mount an external webcam on a stand, angled down to show your fretboard and hands. This helps me see your technique clearly.
- External monitor: Use a second screen for lesson materials, PDFs, or sheet music while keeping Zoom on your main screen.
Apps for lessons
Apps I recommend for bass students to practice more effectively between lessons.
Slows down audio without changing the pitch. Essential for learning songs and transcribing bass lines. Play along at half speed and gradually increase the tempo as you get comfortable. Available for Windows, Mac, iOS, and Android.
Generates realistic backing tracks from chord charts. Great for jazz study, practicing chord changes, and playing along with a virtual band. Available for iOS, Mac, and Android. A Windows version is currently in beta.
A good metronome is essential for developing solid time. Look for one that supports subdivision settings: whole, half, quarter, eighth, triplet, 16th, and swing eighths. Most app stores have several free and paid options.
Download the setup guide (PDF) to print or keep on your phone. It is the short version of this page.